Quickstart Guide for Integrations
The final goal of StartLeft is being integrated within processes that requires the generation of a Threat Model. Examples of this are:
- A CI/CD pipeline for modifications in IaC files.
- A process for creating standardized Threat Models from infrastructure diagrams.
- A process for migrating Threat Models from one threat modeling tool to another.
The more common scenario for these use cases is that they are automatized. For that, it is necessary that StartLeft can be used by another services or applications in a smooth way. The different ways of doing this are explained along this page.
As a service
This type of integration fits specially well when we need to integrate StartLeft with some application that requires OTM conversion features. For instance, IriusRisk provides importing endpoints for different sources that internally rely on a StartLeft service for generating an OTM as a common intermediate state:
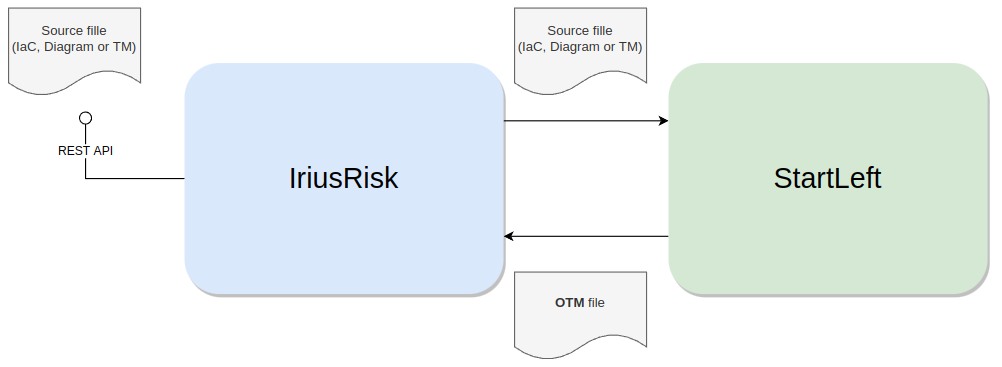
Notice that StartLeft is a stateless service. It requires neither authentication nor authorization since it does not access or stores personal information nor access other services. For this reason, the service is quite simple to deploy and operate.
Deploy locally
If you only want to experiment with the API, this is probably the simplest way. For that, you need to have StartLeft installed in your machine as explained in the Quickstart Guide for Beginners and execute the command:
The server is started by default in the port 5000, but you can configure it with the--port/-p modifier.
Once you have your service started, you can check the API documentation in http://localhost:5000/docs.
Deploy dockerized
This is the most logical option for integration purposes, since it enables the service to be portable to any infrastructure. In the same StartLeft repository a ready-to-use Dockerfile is provided, so you already have what you need to set up your dockerized service.
For trying it, let's clone the StartLeft repository:
Jump into the repo folder:
Optionally you can build the image for a specific version doing checkout of the correspondant release branch. For example, to generate an image for the version 1.5.0, you may execute:
Now, we can create the StartLeft image:
And, finally, we can run the docker container for the image we have just generated. Notice that you can select the port where the service is exposed in a standard Docker way.
If everything works, you should see a log like this:
INFO:     Started server process [1]
INFO:     Waiting for application startup.
INFO:     Application startup complete.
INFO:     Uvicorn running on http://0.0.0.0:5000 (Press CTRL+C to quit)
As in the local deployment, we can check that the service documentation is correctly located in http://localhost:5000/docs.
Another way to verify the availability of the service is performing a request to the health endpoint, which can be done through a curl command like:
This command should return: For more details about how to use the StartLeft API, you can check the REST API page.Custom Dockerfile
The Dockerfile provided should be enough for the most common integration scenarios, but, of course, it is possible to create a custom docker image for StartLeft. For that, you can take the existent Dockerfile available in the root of the StartLeft repository as a base. However, you must bear in mind that every official python image from the Docker Hub for versions over 3.6 should work, but:
- Depending on the base image, you may need to install additional libraries.
- Debian/Ubuntu based python official images present security vulnerabilities. This is the reason we decided to use the Alpine based one despite the fact it is significantly slower than others at building time.
In batch processes
The Command Line Interface enables users to easily create scripts for converting from different sources to OTM in batch, but also to perform other operations like validating files. To do that, you simply need to install StartLeft on your machine or create a StartLeft docker image able to read the scripts you want to process.
Regarding the different functionalities available through the CLI and the REST API, it is important to consider that they do
not have to necessarily match. For example, OTM or mappings validations are available through the validate command, but
there are no REST endpoint for them. On the other hand, not all the formats can be converted into OTM through the parse CLI
command, but all of them are supported in the REST API. These inconsistencies are expected to be solved in the short/medium
term with a small impact, since the transformation logic and the access interfaces are already decoupled. Thus, if you have
special interest in having some feature available through some interface, please raise an issue or create a fork following the
Quickstart guide for developers.
As modules as library (For future)
StartLeft is a complete tool that exposes OTM conversion functionalities through different interfaces. However, it would be very useful for some customers to create their own python tools for parsing different formats to OTM without having to install and use a CLI or set up a REST API.
As you can see in the Architecture page, each StartLeft module is an independent piece of software. Thus, releasing useful modules as the SLPs or the OTM module is currently under study. However, even though an advanced user could manage to install and use StartLeft as a library, it is not recommended because some related changes (like modules' visibility) that could break retro compatibility will probably need to be done.
The final goal would be that, in the future, you could do something like this in your own python script: